The bathroom is one of the special rooms in your home, and to its renovation should be treated with special attention. After all, it is here in large quantities and often pours water, in this room there are large fluctuations in temperature and humidity. For correct and rational organization of finishing works it’s necessary to know exactly where to start the bathroom renovation, and to have an idea of the sequence of work.
- Deciding the type of bathroom renovation
- Draw up a renovation plan for the future design
- Selection and purchase of new plumbing and finishing materials
- Remove the old finishing materials and plumbing
- Laying pipes, electrical wiring and other utilities
- Leveling the walls, ceiling and floor
- Finishing with finishing materials
- Sanitary fixtures installation
- Installing accessories and entry doors
Deciding the type of bathroom renovation
Unplanned. The need for spontaneous repairs may arise if an unforeseen situation has arisen (a burst pipe or you were flooded by the neighbors). If you decide to replace the bathtub, it may also entail a sudden repair (change of sewer pipes, installation of other plumbing, updating of tiles, etc.);
Planned repairs. In terms of complexity and material costs, planned repairs can be major or cosmetic. Of course, cosmetic repairs are cheaper, but such work can be done only if there is no fungus and serviceability of plumbing and plumbing. Such repairs include the replacement of wall and ceiling coverings, renovation of the floor and faucets. And a more serious repair, even if not quite a complete overhaul, requires thorough preparation and a serious approach.
Draw up a renovation plan for the future design
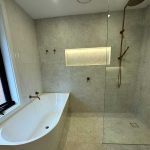
First of all, you should decide on the future design of this room. Imagine what you would like to see your bathroom, decide on the color. Traditional colors for this room are pastel shades or a combination of two tones (for example, blue and blue, or peach and beige).
Then it is necessary to decide what materials will be used for decoration. Bathroom finishes often use:
- Tile
- Porcelain tiles
- Mosaics
- Plastic panels
Carefully inspect your bathroom fixtures and, if necessary, decide on an option to replace outdated plumbing fixtures.
Using a tape measure measure the height, width and length of the room, calculate its area. Determine where the plumbing fixtures will be located, because you are unlikely to be able to change anything after the bathroom renovation.
Selection and purchase of new plumbing and finishing materials
Having decided to do the repair work in their own bathroom, many owners wonder where exactly to start the repair in the bathroom and go to choose new plumbing fixtures and finishing materials. Of course, this stage of repair is very important, but it should follow only after you’ve completely decided on the design, the type of new plumbing and quantity of necessary finishing materials.
Before buying plumbing fixtures, be sure to specify their dimensions and check whether they will fit your bathroom.
It is better to buy finishing materials and tools in one store, where you will be offered a good discount for a bulk purchase. Buy everything you need in full to avoid wasting time and running around looking for the missing material.
Remove the old finishing materials and plumbing
Next, you should prepare the room directly for the repair work. The sink and bathtub is better for the time of repair to dismantle, even if you do not intend to change them.
Then you need to remove the old tile coating, clean the ceiling, walls and floor. If the walls in the bathroom were painted with paint, then it should be completely removed. After all, adhesives or a new layer of paint on the old coating will not hold.
Laying pipes, electrical wiring and other utilities
After dismantling the old flooring, you can begin to replace the pipes. In older homes, in addition to the pipes directly in the bathroom, it is worth replacing the main riser (in the case of a combined bathroom); and in some cases even the water pipes between floors. Since the old pipes may leak, which is fraught with new unplanned repairs and new costs.
At this stage of the repair work is worth replacing and electrical wiring. Determine where there will be electrical appliances, and sum up the required number of outlets, change the wire and switch.
Do not forget to take care of repair and installation of ventilation, it is very important for the bathroom. It is best if the ventilation is forced. Today in the market there are many options for various fans for the organization of forced ventilation.
Leveling the walls, ceiling and floor
The extent and nature of these works depends on the condition of the surfaces. If the walls are very uneven, you will have to level them with plaster. If the walls and ceiling are sufficiently even, there is no need to use a large layer of material, and in some cases you can do with puttying. If the surface needs to level a lot, then the repair may be delayed.
Finishing with finishing materials
Now you can start finishing the walls and ceiling: painting, tiling, covering with selected compounds, etc.
Excellent option would be to cover the ceiling with emulsion paint: the ceiling looks very beautiful, it does not accumulate moisture and you can pick up any shade. A more practical alternative can be the installation of plastic panels or a stretch ceiling.
If you will install a bathtub covered with a screen, you can not tile the floor under it to save material.
Sanitary fixtures installation
Sanitary devices are installed after completing all finishing work, so as not to damage the new (old) plumbing in the process of repair and to ensure unobstructed access to the surfaces of the room, which require finishing.
Installing accessories and entry doors
The final stage of the bathroom renovation is the placement of furniture and accessories (hooks, mirrors, fixtures, etc.). It is also only now that the door is replaced. Do not change the doors earlier: they can easily be damaged during the repair, bringing in and installing plumbing.